Christmas is a time for cherished traditions and heartwarming decorations, and what could be more charming than a vintage fabric Christmas tree? Forget fussy, time-consuming projects; this year, adorn your home with a beautifully rustic tree crafted from repurposed fabrics, created using the fastest and easiest method imaginable. This delightful project is perfect for beginners and experienced sewists alike, requiring minimal sewing skills and even less time. Imagine the unique character and nostalgic appeal your handmade tree will bring to your holiday celebrations – a treasured piece reflecting your personal style and love for vintage finds.
Forget complicated patterns and hours of painstaking stitching. This guide will walk you through a simple yet elegant design that allows you to showcase your favorite fabrics and create a truly one-of-a-kind Christmas tree in a flash. Ready to transform treasured scraps into a festive centerpiece? Let's dive into the step-by-step instructions and create your vintage fabric Christmas tree today!
Preparation and Safety Guidelines
- Fabric (specified in PDF)
- Fiberfill stuffing
- Sewing machine
- Pins or clips
- Scissors
- Always use sharp scissors or rotary cutter to prevent fabric slippage and ensure clean cuts. Dull blades increase the risk of injury.
- Handle your sewing machine needles with care. Never force the fabric, and always unplug the machine before changing needles or performing maintenance.
- If using vintage fabric, pre-wash it to remove any potential dirt, mildew, or loose dyes before starting your project to prevent staining or damage to your finished tree.
Step-by-Step Instructions
Cut Fabric
- Stack multiple fabric pieces together, aligning folds. Lay pattern piece on the fold, trace, and cut all at once for efficiency.

Cut Fabric Sew Tree Sides
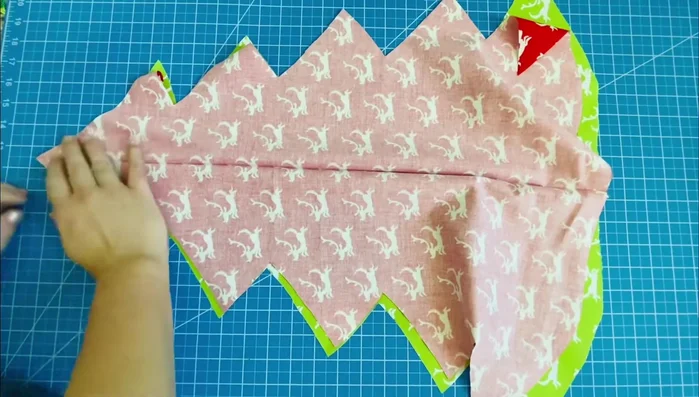
- Place two fabric pieces right sides together, aligning from the tip. Pin or clip, and sew around, leaving a large opening at the bottom. Use the crease as a sewing guide. Leave the needle in the fabric, lift the presser foot, rotate, and continue sewing around corners.
Sew Tree Sides Finish Seams
- Trim seam allowance at tip corners to prevent bulk. Make snips at inverted corners to ease turning. Turn right side out, using fingers or a chopstick to poke out corners gently.
Add Dimension (Optional)
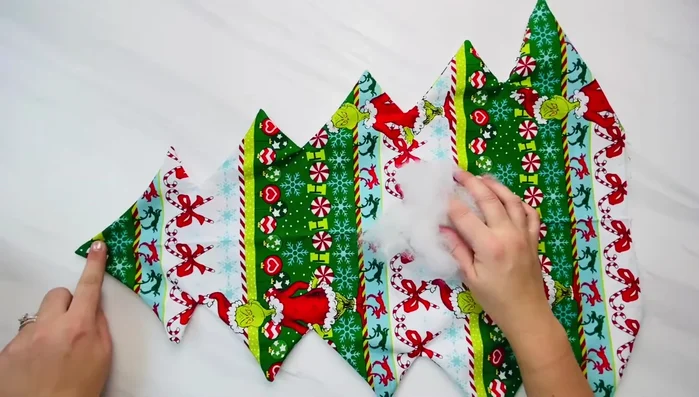
- Add fiberfill to corners (not the tip) for dimension, securing with pins if needed.
Add Dimension (Optional) Prepare Bottom Edges
- Fold bottom edges inwards (3/8 inch seam allowance), pin, and repeat for both tree pieces.
Sew Tree Halves
- Lay tree pieces right sides together, aligning tops. Pin, and sew down the center crease.
Sew Tree Halves Stuff the Tree
- Stuff fiberfill through the bottom openings, pushing towards the top. Use a tool or fingers to distribute the filling evenly.
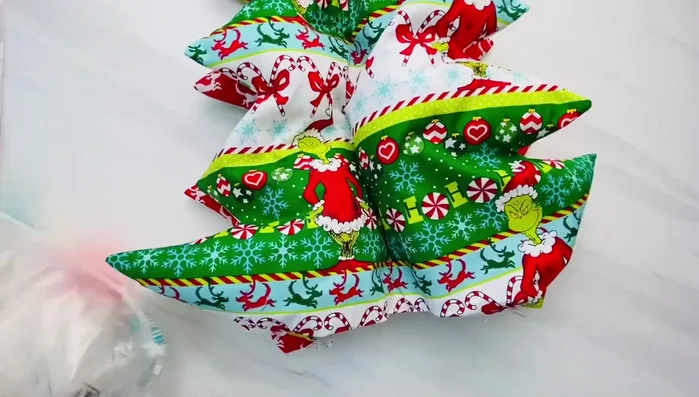
Stuff the Tree Close Bottom
- Fold the bottom edges inward (3/8 inch), pin, and either machine stitch or hand stitch (blind ladder stitch) to close the four openings.


Read more: DIY Fluffy Duck Plushie Tutorial: A Step-by-Step Guide
Tips
- Cut all fabric pieces simultaneously to save time.
- Use the pre-existing crease as a guide when sewing to ensure even stitching.
- Trim corners to prevent bulkiness after turning right side out.
- Use a chopstick or similar tool to easily turn the fabric right side out.
- Adding fiberfill to the corners adds dimension and makes the tree look fuller.